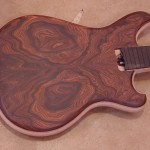
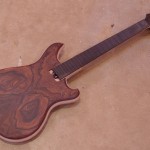
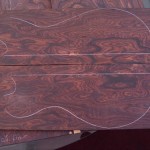
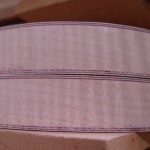
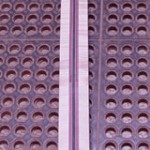
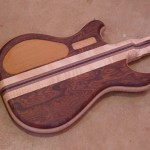
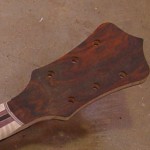
Baby got back.

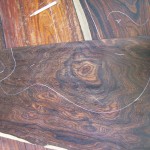
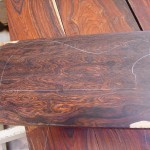
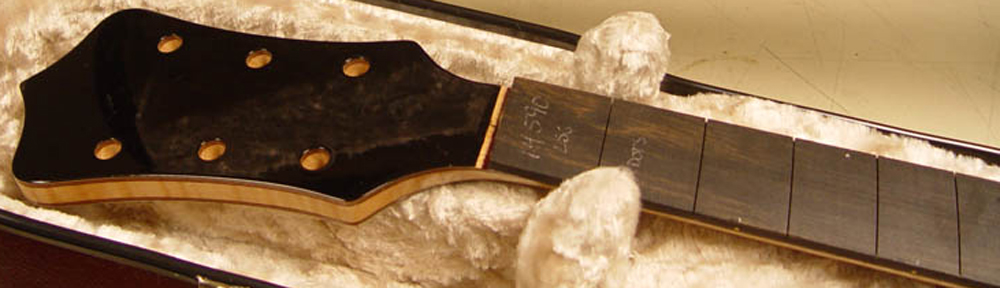
The peghead is made up of multiple wood veneers.  Top to bottom, they are: Gabon Ebony, Maple, Purpleheart, Maple, Purpleheart, Western Flamed Maple, Purpleheart, Maple, Purpleheart, Maple, Coco Bolo.  It essentially matches the wood combination of the body, except the front of the peghead is Gabon Ebony.  The Coco Bolo laminate is from the same slab that the top and back body laminates are from, so the color is a great match.  If you look closely, you can see that the transition from neck to peghead is still just roughed out at this point.

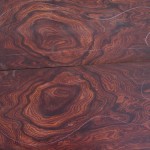
The flame figuring of the neck (and body) is rather pronounced, and should really pop out when the first sealer coat is applied.

Come together.

I’m so happy with how the Coco Bolo top is turning out.  It has darkened up quite nicely since being bookmatched a few weeks ago – and look… what once was a butterfly is now a giant owl!  It really is something special.

The next step for this guitar is the carving phase, where the skilled craftspeople at Alembic will meticulously contour the body, neck, and peghead by hand.  This is also when the pickup and electronics cavities will be routed.  Forthcoming pictures will show how, although it already looks like a guitar, there is still a long way to go before it has its final shape.

Shapes…

These pieces are only rough cut at this point, but you can now see the basic shape of the guitar body, with its two asymmetrical horns (which will eventually get a bit more of a “point” to them).  Even though these are the insides of the laminates, I am able to determine which elements of wood grain made it into the instrument.  I am looking forward to a similar picture of the top laminate!

Also notice the profound change in wood color from the previous entry’s picture, taken when the wood was freshly sliced.  Once it hits the air, Coco Bolo tends to darken up and the yellow/orange components turn to a more brick red.  This color change happens quite rapidly during the first four weeks, but after that initial window, the color change is much more gradual.  The difference in color is further enhanced here because of the glue that has been applied.

Bookmatched beauty.

I decided to bookmatch the outer laminates of the body sandwich for two reasons.  One, it just looks beautiful when you’re working with otherworldly wood.  The second reason is a bit more left-brained.  When you bookmatch wood, you have close to (but not exactly – this is Mother Nature we’re talking about) a mirror image of wood grain.  This makes expansion and contraction a bit more predictable, or at least more-or-less uniform across the width of the guitar.  You generally get stronger construction and more consistent performance out of your instrument when the laminates are bookmatched.  These Coco Bolo laminates have been bookmatched to a thickness of 1/4”.

You never know what you’re going to get when you slice wood open… Sometimes you get a face (a wood gnome), while other times, there’s not much there at all.  When my top board was sliced open, it revealed a beautiful butterfly!  This wood is something special, and I can’t wait to see it with some sealer applied!

On a side note, we decided that the guitar would look better if the top accent laminates of Maple and Purpleheart were also bookmatched to center, along with the Coco Bolo.  Alembic sanded off the top accent laminates that were glued to the body sandwich, and they’ll apply new wood to the Coco Bolo, so the accent lines are not interrupted by the neck at the bout.  The lower accent laminates will remain as is, again to match the bottom Coco Bolo laminate (which is bookmatched, just not to center).

A little closer.

But we’re not quite there yet.  This is the latest control layout, and it is almost right on.  I’ve asked Alembic to lower the 5-way pickup selector more toward the bottom of the electronics cavity, and slightly curve the switch layout, so it follows the contour of the guitar.  The only other thing I’ve asked them to do is to move the MIDI scroll buttons down so they align with the bottom of its volume knob, and about 3/8” to its left.

I’ve already been told that all of these requests are doable, so I’m just awaiting a final drawing.  The next drawing to come will be a more accurate representation.  Alembic won’t actually drill the holes until they send me pictures of the control layout on the actual piece of wood, as cut, and I approve it.  They’ve already started cutting the top and back laminates, so I should have assembly pictures soon.

The inductor is connected to the… single-pole triple-throw switch. The single pole…

…tripple-throw switch is connected to the… amplifier.  The amplifier is connected to the… buffer.  The buffer is connected to the capacitor.  The capacitor…  and THAT’S how the whole thing works!  Almost.  We have completed the circuitry design for the guitar, and you can see the very cool, hand-drawn schematic by Ron Wickersham himself!  In the world of guitar circuitry design, it’s kind of like having Beethoven write music just for you.  Really.  I have asked for some very slight modifications to the circuitry, but nothing major.  The important part is, Alembic has proven they can get the necessary electronics to fit in the cavity of the guitar.  That means that now they can start cutting and assembling!

Also delivered was a very preliminary layout of the controls.  Although the layout will be changing, everything must start somewhere.  I’ve given my suggestions to Mica, who will respond with an alternate layout.

I might need a shoehorn.

I was really expecting to have some more pictures by now – things in clamps, oozing with glue, etc., but I just hit the first of what will probably be several snags along the way.  As of today, no additional wood has been cut for the guitar.  Ron and the rest of the Alembic electronics team have been sitting around trying to figure out how to get the custom electronics compliment to fit in to the body!  Apparently, nobody has asked for my exact combination of electronics to fit in this body shape.

They think they’ll have some answers for me by the end of the week, but some options to get everything to work right include:

  • Make the body shape slightly bigger – Even though they say I would never notice the increased size unless they told me, I’m not sure I want to do that just yet.
  • Have Alembic hardwire some of the electrical connections, instead of using modular connectors – Alembic usually uses modular connectors in their wiring schemes, to make servicing easy.  These connectors take up space, though, and space is at a premium in the body cavity.  Since I’m handy with a soldering iron, I’m pretty confident that this option could work… but will it yield enough space.
  • Simplify the electronics compliment – surprisingly, I’m open to this option.  The Alembic electronics afford a lot of pickup combinations (typically 27!), and I’m not so sure I need to tweak at that level.  It’s more important to me to quickly dial in the sound I want.  I’m going to talk with Alembic today, and give them my thoughts on this.

In order to test out the placement of electronics, Alembic is using a dummy body, the same size and shape I originally called for.  Smartly, they don’t want to cut the wood I selected until they are absolutely sure everything is going to fit!

Things are happening.

I was a little surprised with Mica called me back to talk about the Coco Bolo and casually threw in a, “By the way – we’ve already started assembling your neck and body.”

For the body, I’ve selected a core of highly figured Western Flamed Maple (also referred to as Curly Maple) from Washington.  The flame of the Maple body might seem subdued from the picture, but that’s mostly because this wood was just sanded.  When the sealer coat is applied, you will see some serious figuring!  Western Flamed Maple is not the standard core wood Alembic usually uses for this body shape, but it’s definitely going to look good against the dark Coco Bolo.  Maple will help reinforce the high end of the frequency spectrum, and work with the Coco Bolo to deliver a full, well defined sound.  On either side of the core, there are alternating pinstripes of Purpleheart (also known as Amaranth) and Maple.  Although a useful tonewood itself, the Purpleheart pinstripes here are only ornamental, and won’t contribute much to the overall sound of the guitar.  It has a striking purple color that darkens with age.

I’m doing something a little different with the neck.  Ebony is not often used as a guitar neck laminate (although it is often used in bases), but I’ve chosen Gabon Ebony as the center laminate.  The Gabon Ebony elements for this guitar are sourced, I believe, from Nigeria (or thereabouts).  It is a very heavy wood that, when used in a neck-thru instrument, adds considerable sustain to the fundamental of the note – when you play a note, it lasts longer.  Although difficult to see in the picture, the Ebony is flanked on either side with Maple stringers – thin veneers that separate the Ebony from the Purpleheart accent laminates.  Outer laminates of Western Flamed Maple complete this 7-piece neck, a feature I’ve always wanted in a guitar.  This Maple was selected in an attempt to match the characteristics of the core wood as much as possible.  You can already see a high amount of figuring in the Maple neck laminates, a good sign of things to come!

A neck-thru guitar is one in which the neck literally goes through the body to the bottom of the bout.  The sides of the body are glued on to the neck, then the top and back laminates are added (if they are bookmatched to the center of the guitar).  Neck-thru guitars typically enjoy much greater sustain than set-necked guitars, where the neck is glued or bolted to the body.  This is because with neck-thru construction, the strings do not travel over a joint (where the neck and body meet) that lessens the vibration of the strings.  With neck-thrus, the choice of neck woods has a much greater effect on the tone of the instrument than set-necked guitars, and is the reason why such careful consideration was given to the choice of laminates here.

The one.

This picture shows board ‘E’ in its entirety.  I’ve decided to choose this board for the top and back body laminates, as well as the back headstock laminate.  It’s always good to get the front and back laminates from the same board, to try and maintain an overall look – although you never REALLY know what you’re going to get when you slice the wood open!

Now, another difficult decision – which part of the wood to use?  The entire board stands on its own, like a piece of art.  I’ve been moving the templates around in Photoshop, to help me decide where to cut.  The left template represents the front of the guitar, and the right represents the back.   These templates are not oversized, but actual size.  The body will be beveled about a half-inch from the edge.

Once final positioning is determined, the boards will be cut and added to the body “sandwich” of wood.

More stunning Coco Bolo.

Last week, Mica said she had some more Coco Bolo for me to look at, and here it is.  This board is a staggeringly fine example of old Coco Bolo, clearly something special.  It was pulled out of a private collection of REALLY old wood.  Most photographed examples of Coco Bolo can’t adequately convey the mesmerizing qualities of the wood, and this is no exception – but you can still see from these pictures just how much is going on with this piece… massive swirls, bold figuring, and nice contrast that I think will really pop when sealed.  The top two pictures are from the new board.  The bottom picture shows the new board (‘E’) with my previous top picks, ‘C’ and ‘D’.

This is going to be one difficult choice to make!