The ‘Follow’ Button.

Just a quick note to announce the new ‘Follow’ button at the top of the blog (next to ‘Alembic Factory Visit’, and directly under the banner picture).  Click on it to sign up for email notification.  You will NOT receive emails with each new comment, but only when I post a new entry to the blog.  Now you’ll know when to check in to get the rest of the story!

You also have the opportunity to subscribe when you either register your name or just post a comment.  This is, of course, optional.  You do not have to register in order to post or subscribe.  Confused?  I thought so.

Once your subscription is active, you’ll be able to go in and adjust your settings if you so desire.  You can unsubscribe at any time from the very same page, but why would you want to?

Like a master thief.

Hi everyone, and thanks for checking out our new home!

With everyone’s MobileMe account expiring at the end of June (thank you, Apple), it became necessary to find a new, permanent home for this blog.  So with a little help from WordPress, here we are!

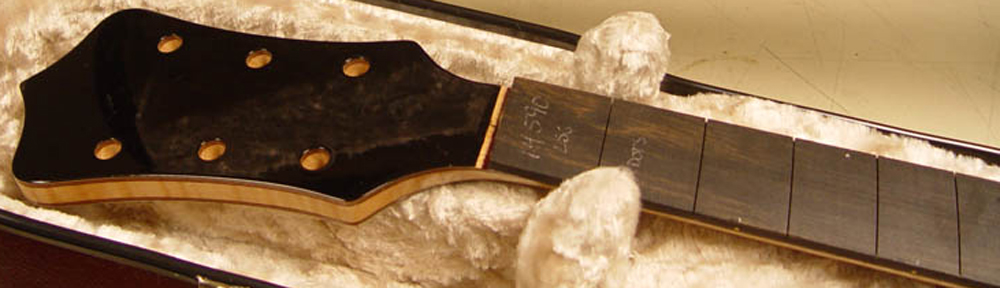
There has been SO MUCH going on behind the scenes at Alembic in the six months since my last post.  The guitar would have been done and in my hands by now, had it not been for a very special addition to the guitar.  I have asked them to do something they’ve never done before, and it has required them to get some new tools as well as come up with a method for implementing my idea.  To do this, Alembic had to build a crude mock-up of the medallion to represent the materials of the real thing – including the many layers of finish, which takes time to create.  Then, they work on the test piece to find a way to bring my idea to reality without damaging the surrounding materials… like a master thief obsessively running through his plan, leaving no stone unturned in an effort to not compromise the real job.

This has taken a long time, but we are about a week away from “getting it done,” so I thought this was a good time to move the blog over.  This step has been the biggest exercise in patience yet, but I have been assured that it is the last bump in the road.  After this is done and the medallion is safely in the guitar, everything else will progress quickly.  I even have assurances that I will have the guitar in time for some upcoming projects!

What keeps me sane is the knowledge that the entire team at Alembic has only my best interests in mind as they have methodically figured out new ways of doing things – all the time keeping the medallion safe from the many attempts of project execution that would have caused irreversible damage.

I anticipate having new pictures in the very near future, so please check back regularly!

In the bag.

What a beautiful sight!

The medallion is now finished! Nearly 19 months after the first sketch was drawn, we can finally see the magnificent results – and it will only look better when it is bound in silver and placed in the guitar.

From concept to execution, this was an incredibly difficult inlay to create. The level of skill required to make it a reality is scarcely fathomable. Just deciding on the materials to use was an agonizingly long process, but it has paid off. Eventually I hope to provide a complete list of build materials and their origins, but here’s a partial list of the more prominent objects, to the best of my knowledge:

• stars and musical notes – sterling silver
• grass – reconstituted Malachite
• path (or is it water?) – Tahitian Black Mother of Pearl
• tree – Lacewood
• skeleton – Mother of Pearl
• shirt – reconstituted Lapis Lazuli
• shirt buttons – 18k gold
• moon – Agoya
• headphone band – Vietnamese Bronze Mother of Pearl
• chair – Spalted Yellow Pashaco

Uniquely, this is the very first time Alembic has ever used Spalted Yellow Pashaco on any of their instruments. With over 100,000 tree species, I guess it’s not that surprising – but still, it’s nice to see them always looking to something new for inspiration! The grain of the chair is from the wood itself and not something painted on (actually there is nothing painted on the medallion at all – everything is the natural texture and coloration of the materials used), and it just works perfectly.

We are inching ever closer to the day when Jack’s inlay is placed in the guitar.

Stars aligning.

Here is a fantastic picture of the near-complete medallion. All the major components are now safely in the “background” disc. The black globs are drops of optically clear epoxy, used here to secure many of the sterling silver stars.

Once the remaining stars are glued into place (you can see where their positions have been drilled through the Ebony), the entire medallion will be sanded and ready for the next step, where it will be attached to a backing and encircled in a ring of sterling silver. This ring will help differentiate the border between the medallion and the top wood of the guitar. Once all this occurs, the entire piece can be inlaid into the body of the guitar. The only element that is not represented here is the smoke from the pipe, which we have chosen to eliminate.

It is amazing to see this come together, after such a long planning process!

Handle with care.

‘Very Fragile.’ That’s what it says inside the little bag. Not to worry, though, as Jack will soon find security in a new ebony home (see below) under his tree. As you can see, things have been moving along quickly! Our subject has his headphones, and has been set in a permanently relaxed position on his Adirondack chair. Things have been going so smoothly (that’s what 18 months of sketching and planning will get you), that Alembic expects the medallion to be completed and placed in the guitar within a week!

If you have a moment, please reacquaint yourself with the color mockup here. It will give you an idea as to the high level of skill and attention to detail present in this piece of art. It truly is remarkable, and as good as it looks here, folks at the shop have been telling me that it is even more impressive in person. I’m also told that jaws are regularly dropping during the shop tour when people enter James’ sanctuary and see what he’s working on.

Pictured below is the piece of ebony into which all the individual objects will be inlayed. Note that for each item cut, its exact counterpart needs to likewise be cut out of this ebony, so it all fits together as a flat, finished piece – making this project (at least) doubly difficult!

Coming to life.

Here is a VERY exciting picture to share! I’ve been waiting for this one for a long time. This is the first glimpse of the actual medallion inlay. For the past few weeks, master inlay artist James has been painstakingly bringing Susan and Mica’s artwork to life – here you see the most important and one of the most intricate portions of the inlay. Each tooth, rib, spinal disc, shirt button, etc. is its own individually cut piece of material, meticulously combined to make one solid object. Shown here as a rough sanding, things will shine up quite nicely when the medallion is finally placed in the body of the guitar.

Over the next few weeks, I expect steady progress as the inlay is completed.

Below are a couple of lower legs whose individual bones have been put together, and are now waiting patiently to be united with their femora.


Counting stars by candlelight.

At some point early on, Mica and I decided to add a star field to the scene. What you see here is the final layout of the stars. Of note, this is an actual star field as it exists in the cosmos, and not a collection of arbitrarily placed dots. The stars will be cut from thin rods of sterling silver in varying diameters.

At this point, the physical creation of the medallion has been going on for about two weeks. For an hour or two at a time, James (the master inlay artist) has been painstakingly cutting the individual elements by hand. You’ll be hearing (and seeing) more about that soon!

Don’t fret.

Late last night, I received two material mock ups of the fingerboard. On the left is the full fingerboard with paua abalone used for the 12th fret oval material. In the middle (and detailed on the right) is the same layout using white Mother of Pearl. The original plan was to use a deep blue paua shell for the oval, but we’re all heavily leaning toward the white MOP at this point. For one thing, my initials have the potential for getting lost in the paua. Secondly, since I had already decided to use white MOP for the 24th fret and tulip tip of the fingerboard, the paua, though beautiful, started to look a bit forced and out of place.

Noticeably absent from the design is the ring of sterling silver that was to bind the 12th fret oval. Ultimately, there might not be enough room to accommodate this without reducing the font size. We also run the risk of making it look too busy by virtue of cramming many different materials in such a small space. While I continue to explore this option, I am not planning on binding the oval at present.

The modified wedge shape for the fret markers remains Tahitian black MOP. In the end, they will be less visible than what’s shown in the mock ups, but the unique way black MOP reflects light will let you know they’re there!

These are very rough mock ups, created so we can decide on the material to be used. Soon, the angle, size, and alignment of each element will be carefully determined, and Mica will ensure that everything is “just exactly perfect.”

A few wisps of smoke.

That’s all that’s left to add to complete the final line art for the medallion.

This revision shows the realistic headphones I wrote about a while back, as well as musical notes that now trail off into the air. You’d be dumbfounded, skeptical, maybe even a bit agitated to learn just how long it too to place the notes “just right.” At least it’s done, though, and it’s one less thing to think about.

There’s nothing stopping the materials from being cut at this point, and I suspect it has already started. I’ll get another line art revision just to add the smoke elements from the pipe, but that’s it. At some point I’ll also have a new color mockup made, but that won’t hold up cutting either.

We had been going back and forth about how to bind the medallion, and we’ve come to the conclusion that a thick band of sterling silver will look best. Shell should start flying soon!

Case open.

When you’re building a one-of-a-kind instrument, you’re pretty much obligated to respect it with the best case you can to protect it. Enter Calton Cases – maker of exquisite, custom-designed instrument cases. This case has been made specifically to fit my guitar, with detailed measurements to ensure a snug and secure fit.  It is structured from sheets of carbon fiber with a fiberglass exterior, which keeps the weight down while providing near indestructible protection. A carbon fiber/fiberglass composite case is about 25% lighter than its 100% fiberglass counterpart, yet has the same or better strength properties. The seams along the lid are water proofed (not that I’m planning on leaving this out in the rain, but it would survive sitting on a tarmac in foul weather). You can see upper and lower headstock ramps, which, along with the tall neck collar, immobilize that part of the instrument. What you can’t see is the personalized ID tag with my name and phone number.

I had many color choices, and actually changed my mind a few times after I placed the order. In a sudden flash of clarity, I moved forward on a burgundy exterior with a plush beige interior. I think it suits the instrument nicely.

I had Calton ship this case directly to Alembic (from Canada), so that when the guitar does finally make its cross-crountry trek, it will arrive in high style, as it should.